3/18/2017

Parking Lot Trick

Trick for finding your parking space like a pro.

Are you like me and set out thinking, "I have a great memory.  There's no way I'll forget where I parked!"...then hours later, when you're already exhausted, find yourself wandering around the same 4 aisles like Dory, only to find you're in the wrong lot?  ...Yep.

Here's my trick.  Simple, but effective.  Take a photo of your parking lot marker.  Duh.  We took the opportunity to commemorate the beginning of our journey with these photos, so we hammed it up a little.  At any rate, it was a great step saver at the end of a very long day of walking.  I checked my fitness tracker and we walked 6 miles in Islands of Adventure and through City Walk before we could even start looking for our car.  Every.  Step.  Counts!

find your car without GPS
Get your head out of the way, Mom.
There we go.

These are their E.T. Faces.

Got us back safely and quickly to our parking space.  Future us thanked past us for the favor.
What tips do you have for Theme Parks?


3/15/2017

Upgrade for your Contractor-Grade home lighting, cheap or free, that's good for me.

Faux Rice Paper and Gold Lantern... for less than $10

I bought a gold, metal basket at Michael's a week ago.  Because it was on sale (woo!) and because I've been eyeing something to replace the contractor light fixture we have in our kitchen.

Here is the monster.

solution for problem lights hack fix pinterest
Icky lights affectionately called "boob" lights.
Can you see it?

In 30 minutes I had the glass part of the fixture off and covered the inside of the metal basket using the method below.  Please please only do this with LED bulbs and be careful about your safety and the safety of your house.  Here's how I achieved the look.

Step 1: Cut waxed paper in half length-wise, then fold each half length-wise.  Like this.

Step 2: Fold to make a V shape.

Step 3: Fold back over the original piece so it looks like an awareness ribbon.

Step 4: Cut a bottom to lay down and glue to your basket.  Lay the folded shapes over each other to make a pattern. 

Step 5: Check periodically to make sure that your folded pattern design looks good from the outside of the basket...this is the side that will be visible!

Step 6: Line the inside of your folded shapes with one last layer of waxed paper to cover any gaps.  Tape.

Step 7: Hang.  I used gold craft wire threaded around the base of the light fixture. Only try this with LED Bulbs so your paper doesn't melt or have any danger of becoming a fire hazard.


Do you have a nasty contractor light lurking in your home?  What have you done to fix it?


3/13/2017

How to Hack your Classroom Seating:  Future You Will Thank You.

classroom hacks name tags easy cheap omgenius

What do you do when you are a first year teacher of 500 students, 10 grade levels, and more than 23 homerooms?  Get crafty, of course. 

I bought multiple packs of colored circles in the clearance bin at Walmart.  Tip:  You can get great deals after Back to School season is over, or any holiday really.  Take advantage of the sales and squirrel things away for next year...that's how you furnish a classroom for cheap.   
These circles came from a welcome banner set, 24-pack, and are approximately 5-6 inches in diameter.  I think I spent $.25 a pack on clearance.  I had purchased a pack before clearance and they were around $4.99 for 24.

Laminate the circles BEFORE you write on them.  Sharpie comes off with alcohol and my internship teacher always had a spray bottle of it on hand.  Nail polish remover works well, too.

Punch a single hole in the top of the circle and put a colorful reinforcement circle around it.

Choose a color for each homeroom and write each student's name on it in order of your classroom roster.  Not only will your grades be easy to collect and alphabetize, it makes taking attendance much easier.

classroom hack smart cheap inexpensive name tags

Each tag should have:
Student's First name (Middle)
Student's classroom number/seat/station (circled on the top)
Homeroom number or code on the bottom (makes it easier to find when flipping through students)

Here's the genius part.
Hang the circles on shower hooks (see photo below) 1 pack of 12 = $.99
Hang the hooks on Command Hooks ($4.99ish a pack?)
Watch how easy it is to teach students to flip to their name upon arrival or get their station ready for the next class.
cheap hook from walmart helps hang classroom name tags

Why is this beneficial?  This year I was a new teacher in a new school and I challenge myself from the very onset to learn each child's name as early as I can (ideally within the first or second time I see them).  It makes classroom management easier if I can call on students by name and it makes a HUGE difference in the amount of respect they feel from me if I have taken the time to learn their name.  The second piece is that in a world of similarly colored uniform tops (ours are red and white polos, but on PE days they're all in gray t-shirts) and similar hairstyles, most kids look the same from the back.  Now, if I am helping a student across the room, I can glance at a student's seat, notice their hand raised, and call their name correctly and quickly.  I am a visual person and all the little word cues around the room help both me and the kids.  It's genius.

I am a technology teacher and my students sit around the room in a U-shape, then a small island in the middle.  Not only has this been a practical time-saver, the circles have held up well and the students can help me take care of them!  Next year I can move the circle with the child's class or I can erase the circles and start again.  #omgenius


3/02/2017

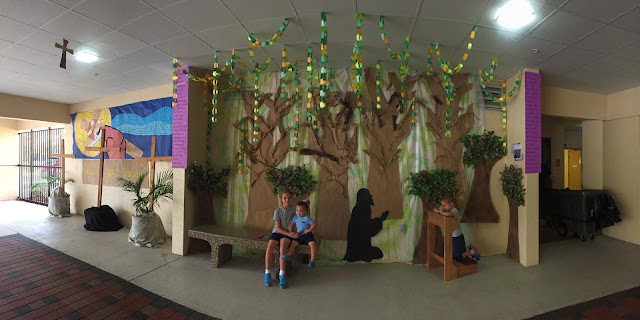
Lent Decoration Idea : Garden of Gethsemane Theme

Lenten Reflection Area

Pray with Jesus in the Garden of Gethsemane.  Jesus is Timeless, so we can spend time with Him in the Garden.  Reflection on Matthew 20:36-40 and Padre Pio.

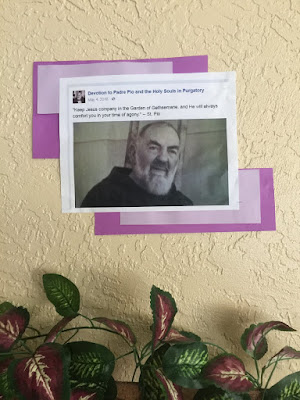
Padre Pio Keep Jesus company in the Garden of Gethsemane and He will always comfort you in your agony
The Inspiration:
"Keep Jesus Company in the Garden of Gethsemane and He will always comfort you in your times of agony." - St. Padre Pio
Keep Jesus company in the Garden of Gethsemane and He will always comfort you in your time of agony - St. Padre Pio

Pieces from Pinterest and notes for how to use them: (Will tag original Pinners later)


All the Pieces put together.  See?
Happy Little Tree!

12/11/2013

DIY Magnetic Memo Board Gift

So simple you'll say, "Say What!?"

Hold on to your hat.  This craft is a pizza pan.  From the Dollar Store.  And it's magnetic.

1.  Get a pizza pan
2.  Get a square of fabric large enough to cover that pizza pan.
3.  Iron your fabric (spraying with a water bottle, stretching, then letting dry will do the trick, too)
3.  Make a line of hot glue little by little around the inner circle of the pan (too much at one time and it will dry).  Smooth it down as you go.
5.  Flip the pan over and repeat, gluing down little by little and smoothing as you go.
6.  Optional:  Find another piece of fabric to glue down over the back to make it look all profesh.
7.  Decorate at will.

Pizza pan = $1
Using other stuff you have at home = free

Tip:  I bought this fabric in the "remnant" section of Hobby Lobby (or any other Walmart or Craft Store).  I bought the yellow for $2 and was able to make 4 projects and the blue for $2 and was able to make 4 projects.  I still have leftover fabric to use!


Le back.


Here's what I spent in real life.  If you are a craft-a-holic or crazy genius you may able to make this for free.  I wanted a cute little circle memo board, but if you use your imagination I bet you have other magnetic things lying around the house (p.s.  Test them with a magnet before you go all nuts making a project that may not work)

Yellow project:
Dollar Store Pizza Pan: $1
Fabric: about $.75
Hot glue:  Free
Felt to cover back:  Free
Black Braid on front:  old t-shirt I cut up into strips = free
Little zebra flower I made out of felt:  free

Blue Project:
Dollar Store Pizza Pan: $1
Fabric: about $.75
Hot glue:  Free
Felt to cover back:  Free
Blue Felt Braid on front:  Free
Little yellow flower I made out of felt:  free

Now, go scout around your house, you crafty maven.  I bet you already have most of this stuff and it's just waiting to be made into your art.
Want a step-by-step of the Jewelry Frame gift you see here?  Click this link and be prepared to be amazed.  It's just as simple and equally cheap.